2020-03-13
React-Native 실행 환경설정
맥(Mac)에 React Native 개발 환경 구축하기
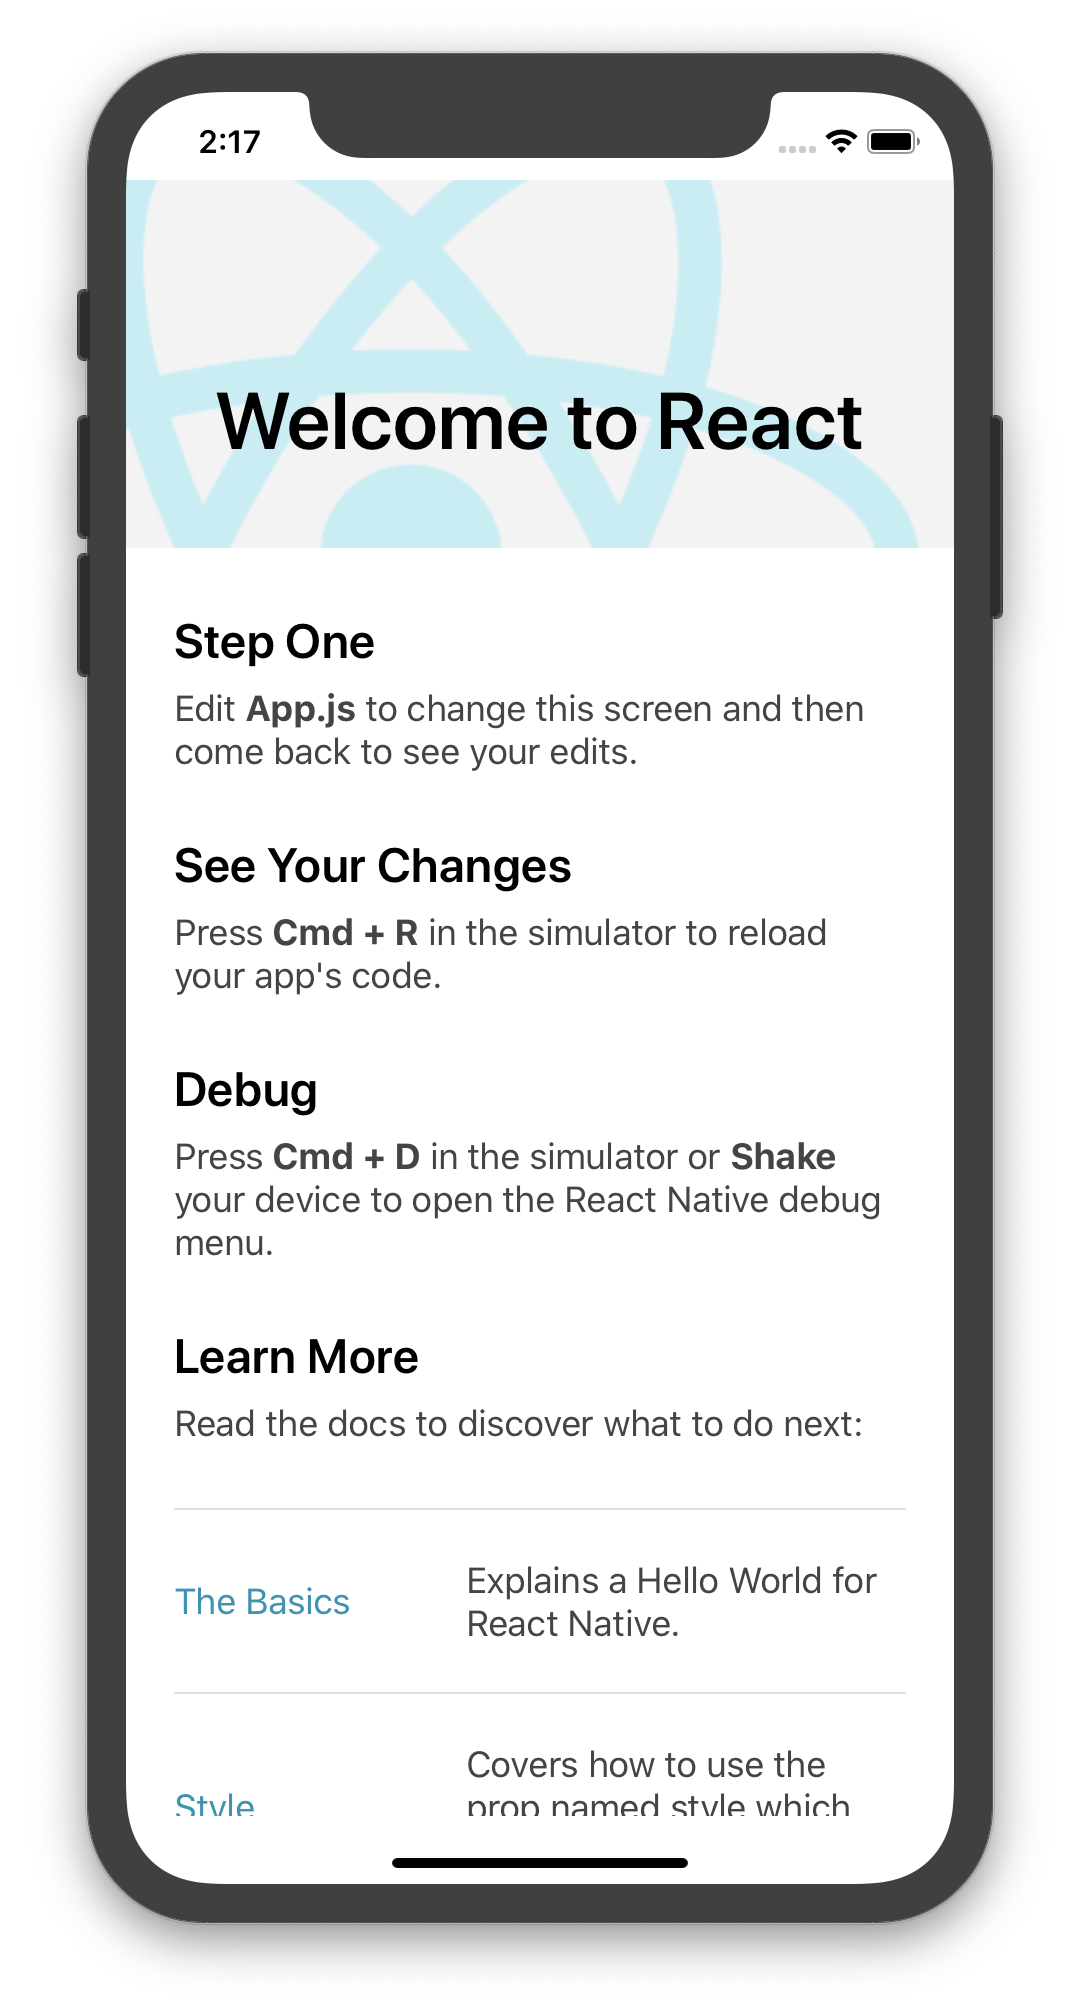
이 블로그의 설정 방법을 따라가면서 React-Native 실행환경을 설정했다.


성공!
JavaScript 문법
삼항연산자
condition ? true : false
- 한 줄이 너무 길 때
let text = array.length === 0 ? `배열이 비어있다.` : `배열이 비어있지 않다`;
let text = array.length === 0 ? `배열이 비어있다.` : `배열이 비어있지 않다`;
Truthy and Falsy
undefined 와 null 은 모두 false 로 간주됨.
Falsy 한 값
undefinednull0NaNfalse
이 외에는 모두 true 로 간주됨
! , !! 를 활용해 Falsy 한 값과 Truthy 한 값을 한번에 처리할 수 있음
단축 평가 논리 계산법
A && B 연산자를 사용할 때 A가 Truthy 한 값이라면, B가 결과값이 되고, Falsy 한 값이라면, A가 출력된다.
console.log(true && 'hello'); // hello
console.log(false && 'hello'); // false
console.log('hello' && 'bye'); // bye
console.log(null && 'hello'); // null
console.log(undefined && 'hello'); // undefined
console.log('' && 'hello'); // ''
console.log(0 && 'hello'); // 0
console.log(1 && 'hello'); // hello
console.log(1 && 1); // 1
A || B 연산자는 만약 A가 Truthy 한 값이라면, A가 결과값이 되고, Falsy 한값이라면 B가 출력된다.
console.log(true || 'hello'); // true
console.log(false || 'hello'); // hello
console.log('hello' || 'bye'); // hello
console.log(null || 'hello'); // hello
console.log(undefined || 'hello'); // undefined
console.log('' || 'hello'); // hello
console.log(0 || 'hello'); // hello
console.log(1 || 'hello'); // 1
console.log(1 || 1); // 1
함수의 기본 파라미터
파라미터에서 = 기호를 사용해 기본값을 설정할 수 있다.
function calculateCircleArea(r = 1) {
	return Math.PI * r * r;
}

const area = calculateCircleArea();
console.log(area); // 3.141592653589793
function calculateCircleArea(r = 1) {
	return Math.PI * r * r;
}

const area = calculateCircleArea();
console.log(area); // 3.141592653589793
조건문 더 스마트하게 쓰기
- 특정 값이 여러 값 중 하나인지 확인해야 할 때
function isAnimal(text) {
	return (
		text === '고양이' || text === '개' || text === '거북이' || text === '너구리'
	);
}

console.log(isAnimal('개')); // true
console.log(isAnimal('노트북')); // false
function isAnimal(text) {
	return (
		text === '고양이' || text === '개' || text === '거북이' || text === '너구리'
	);
}

console.log(isAnimal('개')); // true
console.log(isAnimal('노트북')); // false
배열의 includes 함수를 사용
function isAnimal(name) {
	const animals = ['고양이', '개', '거북이', '너구리'];
	return animals.includes(name);
}

console.log(isAnimal('개')); // true
console.log(isAnimal('노트북')); // false
function isAnimal(name) {
	const animals = ['고양이', '개', '거북이', '너구리'];
	return animals.includes(name);
}

console.log(isAnimal('개')); // true
console.log(isAnimal('노트북')); // false
화살표 함수 사용
const isAnimal = (name) => ['고양이', '개', '거북이', '너구리'].includes(name);

console.log(isAnimal('개')); // true
console.log(isAnimal('노트북')); // false
const isAnimal = (name) => ['고양이', '개', '거북이', '너구리'].includes(name);

console.log(isAnimal('개')); // true
console.log(isAnimal('노트북')); // false
- 값에 따라 다른 결과물을 반환해야 할 때
function getSound(animal) {
	if (animal === '개') return '멍멍!';
	if (animal === '고양이') return '야옹~';
	if (animal === '참새') return '짹짹';
	if (animal === '비둘기') return '구구 구 구';
	return '...?';
}
function getSound(animal) {
	if (animal === '개') return '멍멍!';
	if (animal === '고양이') return '야옹~';
	if (animal === '참새') return '짹짹';
	if (animal === '비둘기') return '구구 구 구';
	return '...?';
}
switch 사용
function getSound(animal) {
	switch (animal) {
		case '개':
			return '멍멍!';
		case '고양이':
			return '야옹~';
		case '참새':
			return '짹짹';
		case '비둘기':
			return '구구 구 구';
		default:
			return '...?';
	}
}

console.log(getSound('개')); // 멍멍!
console.log(getSound('비둘기')); // 구구 구 구
function getSound(animal) {
	switch (animal) {
		case '개':
			return '멍멍!';
		case '고양이':
			return '야옹~';
		case '참새':
			return '짹짹';
		case '비둘기':
			return '구구 구 구';
		default:
			return '...?';
	}
}

console.log(getSound('개')); // 멍멍!
console.log(getSound('비둘기')); // 구구 구 구
객체 활용
function getSound(animal) {
	const sounds = {
		개: '멍멍!',
		고양이: '야옹~',
		참새: '짹짹',
		비둘기: '구구 구 구',
	};
	return sounds[animal] || '...?';
}

console.log(getSound('개')); // 멍멍!
console.log(getSound('비둘기')); // 구구 구 구
function getSound(animal) {
	const sounds = {
		개: '멍멍!',
		고양이: '야옹~',
		참새: '짹짹',
		비둘기: '구구 구 구',
	};
	return sounds[animal] || '...?';
}

console.log(getSound('개')); // 멍멍!
console.log(getSound('비둘기')); // 구구 구 구
- 값에 따라 다른 코드 구문을 실행할 때
function makeSound(animal) {
	const tasks = {
		개() {
			console.log('멍멍');
		},
		고양이() {
			console.log('고양이');
		},
		비둘기() {
			console.log('구구 구 구');
		},
	};
	if (!tasks[animal]) {
		console.log('...?');
		return;
	}
	tasks[animal]();
}

makeSound('개');
makeSound('비둘기');
function makeSound(animal) {
	const tasks = {
		개() {
			console.log('멍멍');
		},
		고양이() {
			console.log('고양이');
		},
		비둘기() {
			console.log('구구 구 구');
		},
	};
	if (!tasks[animal]) {
		console.log('...?');
		return;
	}
	tasks[animal]();
}

makeSound('개');
makeSound('비둘기');
비구조화 할당 (구조분해) 문법
비구조화 할당
const object = {a: 1, b: 2};

const {a, b} = object;

console.log(a); // 1
console.log(b); // 2
const object = {a: 1, b: 2};

const {a, b} = object;

console.log(a); // 1
console.log(b); // 2
- 함수의 파라미터
const object = {a: 1, b: 2};

function print({a, b}) {
	console.log(a);
	console.log(b);
}

print(object);
const object = {a: 1, b: 2};

function print({a, b}) {
	console.log(a);
	console.log(b);
}

print(object);
비구조화 할당시 기본값 설정
const object = {a: 1};

const {a, b = 2} = object;

console.log(a); // 1
console.log(b); // 2
const object = {a: 1};

const {a, b = 2} = object;

console.log(a); // 1
console.log(b); // 2
- 함수의 파라미터
const object = {a: 1};

function print({a, b = 2}) {
	console.log(a);
	console.log(b);
}

print(object);
// 1
// 2
const object = {a: 1};

function print({a, b = 2}) {
	console.log(a);
	console.log(b);
}

print(object);
// 1
// 2
비구조화 할당시 이름 바꾸기
const animal = {
	name: '멍멍이',
	type: '개',
};

const nickname = animal.name;

console.log(nickname); // 멍멍이
const animal = {
	name: '멍멍이',
	type: '개',
};

const nickname = animal.name;

console.log(nickname); // 멍멍이
animal.name 값을 nickname 값에 담고 있다. 이를 비구조화 할당을 사용한다면,
const animal = {
	name: '멍멍이',
	type: '개',
};

const {name: nickname} = animal;
console.log(nickname);
const animal = {
	name: '멍멍이',
	type: '개',
};

const {name: nickname} = animal;
console.log(nickname);
: 문자를 사용해서 이름을 바꿔줄 수 있다.
배열 비구조화 할당
const array = [1, 2];
const [one, two] = array;

console.log(one);
console.log(two);
const array = [1, 2];
const [one, two] = array;

console.log(one);
console.log(two);
배열 안에 있는 원소를 다른 이름을 새로 선언해주고 싶을 때 사용하면 유용. 객체 비구조화 할당과 마찬가지로 기본값 지정이 가능.
const array = [1];
const [one, two = 2] = array;

console.log(one);
console.log(two);
const array = [1];
const [one, two = 2] = array;

console.log(one);
console.log(two);
깊은 값 비구조화 할당
const deepObject = {
	state: {
		information: {
			name: 'younho9',
			languages: ['korean', 'english', 'chinese'],
		},
	},
	value: 5,
};
const deepObject = {
	state: {
		information: {
			name: 'younho9',
			languages: ['korean', 'english', 'chinese'],
		},
	},
	value: 5,
};
여기서 name , languages , value 값을 밖으로 꺼내고 싶을 때
const deepObject = {
	state: {
		information: {
			name: 'younho9',
			languages: ['korean', 'english', 'chinese'],
		},
	},
	value: 5,
};

const {name, languages} = deepObject.state.information;
const {value} = deepObject;

const extracted = {
	name,
	languages,
	value,
};

console.log(extracted); // {name: "younho9", languages: Array[3], value: 5}
아래의 코드는 다음과 같다
const extracted = {
	name: name,
	languages: languages,
	value: value,
};
const extracted = {
	name: name,
	languages: languages,
	value: value,
};
다른 방법은
const deepObject = {
	state: {
		information: {
			name: 'younho9',
			languages: ['korean', 'english', 'chinese'],
		},
	},
	value: 5,
};

const {
	state: {
		information: {name, languages},
	},
	value,
} = deepObject;

const extracted = {
	name,
	languages,
	value,
};

console.log(extracted);
const deepObject = {
	state: {
		information: {
			name: 'younho9',
			languages: ['korean', 'english', 'chinese'],
		},
	},
	value: 5,
};

const {
	state: {
		information: {name, languages},
	},
	value,
} = deepObject;

const extracted = {
	name,
	languages,
	value,
};

console.log(extracted);
이렇게 하는 방법도 있다.
자바스크립트에서 비동기 처리 다루기

function work() {
	const start = Date.now();
	for (let i = 0; i < 10000000; i++) {}
	const end = Date.now();
	console.log(end - start + 'ms');
}

work();
console.log('다음 작업');
function work() {
	const start = Date.now();
	for (let i = 0; i < 10000000; i++) {}
	const end = Date.now();
	console.log(end - start + 'ms');
}

work();
console.log('다음 작업');
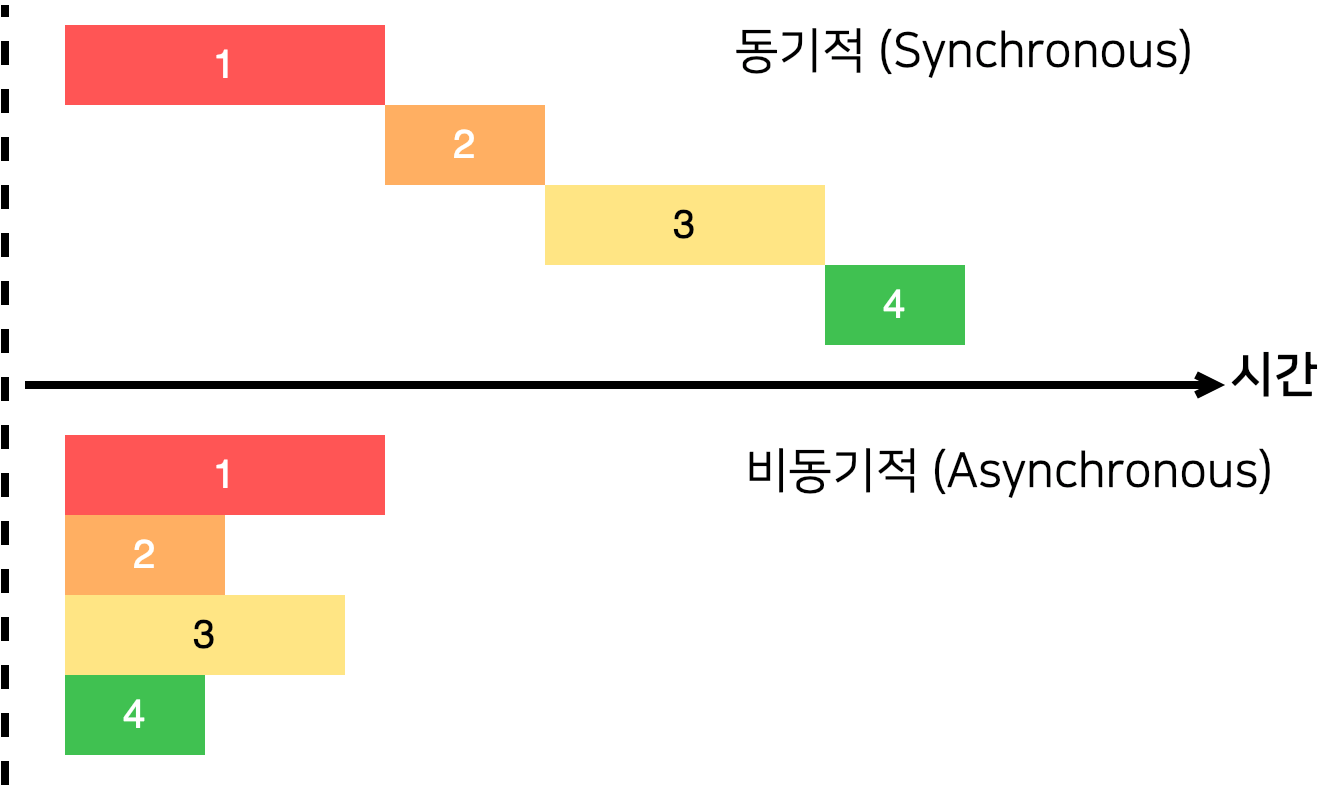
work() 를 수행하는 동안 다음 작업이 진행되지 않는다.
이를 비동기적으로 처리하게 만들고 싶다. → setTImeout() 함수 사용
function work() {
	setTimeout(() => {
		const start = Date.now();
		for (let i = 0; i < 1000000000; i++) {}
		const end = Date.now();
		console.log(end - start + 'ms');
	}, 0);
}

console.log('작업 시작!');
work();
console.log('다음 작업');
function work() {
	setTimeout(() => {
		const start = Date.now();
		for (let i = 0; i < 1000000000; i++) {}
		const end = Date.now();
		console.log(end - start + 'ms');
	}, 0);
}

console.log('작업 시작!');
work();
console.log('다음 작업');
먼저 work() 이후의 작업을 실행하고 work() 는 백그라운드에서 실행한다.
만약 비동기적으로 처리하면서 work() 함수가 끝난 이후에 어떤 작업을 처리하게 만들어주고 싶다면, 콜백 함수를 사용할 수 있다.
function work(callback) {
	setTimeout(() => {
		const start = Date.now();
		for (let i = 0; i < 1000000000; i++) {}
		const end = Date.now();
		console.log(end - start + 'ms');
		callback();
	}, 0);
}

console.log('작업 시작!');
work(() => {
	console.log('작업이 끝났어요!');
});
console.log('다음 작업');
function work(callback) {
	setTimeout(() => {
		const start = Date.now();
		for (let i = 0; i < 1000000000; i++) {}
		const end = Date.now();
		console.log(end - start + 'ms');
		callback();
	}, 0);
}

console.log('작업 시작!');
work(() => {
	console.log('작업이 끝났어요!');
});
console.log('다음 작업');
work() 가 끝난 뒤에 수행할 함수(작업)를 파라미터로 넘겨준다.
Promise
그런데 만약 비동기 작업이 많아질 때, 모두 콜백 함수로 처리하면 코드가 난잡해지게된다.
function increaseAndPrint(n, callback) {
	setTimeout(() => {
		const increased = n + 1;
		console.log(increased);
		if (callback) {
			callback(increased);
		}
	}, 1000);
}

increaseAndPrint(0, (n) => {
	increaseAndPrint(n, (n) => {
		increaseAndPrint(n, (n) => {
			increaseAndPrint(n, (n) => {
				increaseAndPrint(n, (n) => {
					console.log('끝!');
				});
			});
		});
	});
});
이를 위해 만들어진 ES6에 도입된 기능이 Promise 이다.
Promise 는 성공할 수도 있고, 실패할 수도 있다. 성공할 때는 resolve 를 호출해주고, 실패할 때는 reject 를 호출한다.
const myPromise = new Promise((resolve, reject) => {
	setTimeout(() => {
		resolve(1);
	}, 1000);
});

myPromise.then((n) => {
	console.log(n);
});
const myPromise = new Promise((resolve, reject) => {
	setTimeout(() => {
		resolve(1);
	}, 1000);
});

myPromise.then((n) => {
	console.log(n);
});
 Younho9 Notes